CodeCharge allows developers to connect to a MySQL database using MyODBC. This documenation will walk you through installation, configuration, and implementation of this process. A couple things you will need before we start:
Ok, we're ready to start!
Configuring the properties of your site:
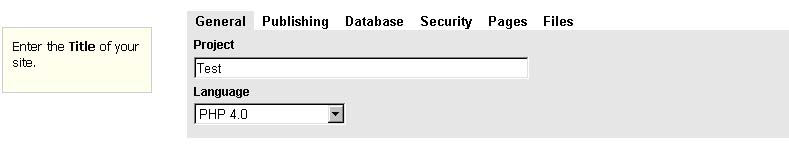
Start CodeCharge, and select properties from the left. You should see this:
This is where you will configure your website creation process. Enter a Project title, and select a language. For this example, I will use "Test" and PHP 4.0. Next, click on the Publishing tab. You will see this:
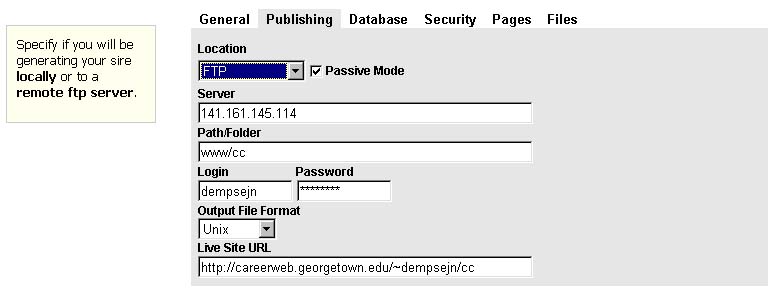
For this example select FTP. If you're behind a firewall, then click on Passive
Mode. Next, enter the IP of the server you are using. Note: this is not the
IP of the MySQL server--this is the server where you will publish your files.
Then, enter the path to your HTML files. On most servers, you will login to
your home directory. Then, you'll change directories to your web directory (often
www) and then you'll work on the files there.
Next, enter your login and password for the server. The Output File Format option
deals with newlines and characters that are different, depending on what system
you're using. Finally, enter the full URL of the website. Notice that the folder
specified in Path/Folder comes after my username. This is where your files will
be located.
Now, click on Database. You will see the following:
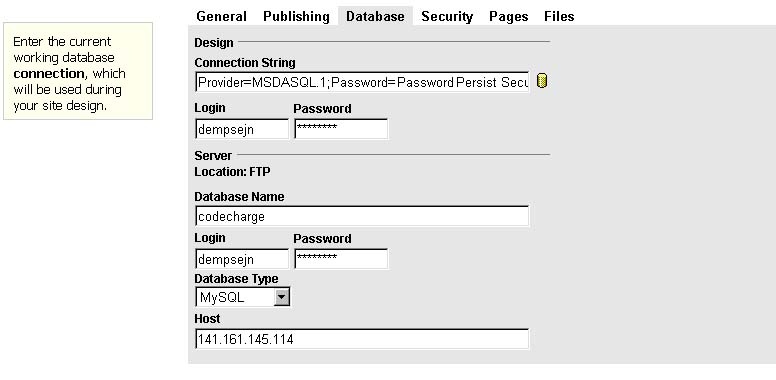
Now, you must have MyODBC setup and configured to procede from here. Click here to jump down to the MyODBC setup and installation section. When done, return here. Click on the yellow button at the right of connection string. This popup the window "Data Link Properties" as shown below:
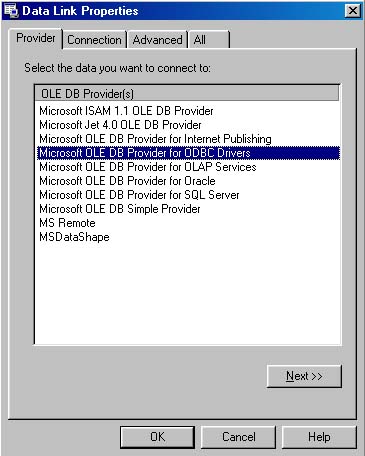
Select Microsoft OLE DB Provider for ODBC Drivers and click next.
In the next window, leave the "Use data source name" option selected,
click on the dropdown list, and select sample-MySQL. Enter your MySQL username
and password in step 2, and click Test Connection to make sure everything's
working. At this point, if everythings worked, click ok. Your Connection String
will now be entered.
Now you're ready to enter the information about your database. Enter the name of your database, and the login and password you use to connect to it. Next, select the Database Type. For our purposes, I will select MySQL. Finally, enter the IP of on which MySQL is running. If you do not know this, or if you try to enter the IP of the server you log into, and it does not work, e-mail your hosting provider or System Admin. Sometimes MySQL servers are run on different IP's than the web documents to better organize the backend systems.
For now leave the Security and Pages tabs alone. For the files tab, enter your information like the picture below:

The Source Folder field refers to your local computer. So, if
you have save your files in the examples folder of CodeCharge, and you put your
images inside a folder named 'Images' which is in that same folder, then the
path to your folder would be Images. You do not need to worry about full paths.
CodeCharge will use the path information of where you save your files, and append
the source folder onto that path.
The Destination/Server Folder refers to the directory on your server where the
images will go. In the above example, I have made a directory under my main
web directory (www) named cc. This is where my files are saved when they're
published. Under my cc directory I made a directory for images called 'images'.
Be sure to enter the full path to your directories.
Remote Permissions
If you are running your own MySQL server, then make sure your username has % entered in your Host field. This 'wildcard' will allow you to connect to the MySQL database from any host. If you make the changes yourself, don't forget to flush privileges. This can be a pain if you make the changes but forget to do this; the change won't take place until you do so. If you are using a hosting company, then this is most likely already set, and you would not have the permissions to change it. Send your host or System Admin an e-mailing asking for the change if needed.
Downloading and installing MyODBC
You can download MyODBC from the MySQL website at http://www.mysql.com/downloads/api-myodbc.html
The installation process is simple:
You have now configured MyODBC to connect to a remote MySQL database. Test it with the admndemo.exe program:
You should now see a window that says "user@sample-MySQL" and another that says "User user successfully connected to sample-MySQL. You can now execute SQL queries by typing the text in the top "user@sample-MySQL" window. For example, to see a list of the tables in your database, type this in the window:
show tables
Then you can either press control-e, or select Execute from the Command menu selection. Note: you don't need to put a semi-colon after your query. Also, the entire contents of the window are flushed, so each new query must be entered by itself you will get an error if you try this show tables show tables
If you are finishing this and would like to return to the Database configuration section, click here
Creating a Database
Perhaps you already have your database setup. If not, then here is a brief
start. You can also find links to tutorials on the Internet at the end of this
document.
To create a database named projectOne, use this SQL statement:
CREATE DATABASE projectOne;
The caps are not needed, but are helpful in keeping your SQL easily spotted. To create a table within your database:
CREATE TABLE tablename (id INT NOT NULL PRIMARY KEY AUTO_INCREMENT, field1
  VARCHAR, field2 VARCHAR);
This is a very basic example, and you don't need to follow it. However, you
will find that you will often want the id field as configured here.
SQL is a very simple language to use, and you can do much with it. To learn
more, check out the links at the end of this tutorial.
Sample scripts can also be downloaded from the CodeCharge website at http://www.codecharge.com/download/?templ=examples&example_id=4
Troubleshooting
I've done everything exactly as described, but I can't connect to the database. What's going on?
For Windows 98 users, make sure you've update your Data Access Components.
The following patch should take care of your problem: http://www.microsoft.com/data/download_260rtm.htm
Download it, install, and try everything again.
Useful Links